Приветствую вас, мои дорогие читатели. Как удалить драйвер принтера в Windows 8? Таким вопросом задались пользователи системы Windows 8. На блоге я уже рассказывал про удаление драйвера от принтера, но по сравнению с Windows 7, процесс удаления несколько отличается, однако первый шаг одинаковый – нам необходимо попасть в «Панель управления».

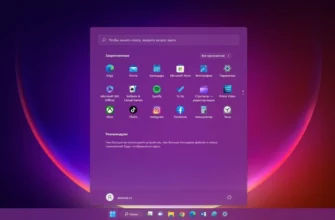
Я не буду здесь расписывать разные способы, как это можно осуществить, приведу лишь один пример: на клавиатуре зажимаем клавиши «Win» + «X».

В появившемся меню снизу экрана слева, выбираем «Панель управления», которая может также называться «Control Panel». Когда она открылась, напротив надписи «Просмотр» нужно установить параметр «Категории», далее кликнуть левой кнопкой мыши по пункту: «Удаление программы».
В появившемся списке ищите название модели своего принтера, выделяем его и нажимаем кнопку «Удалить».
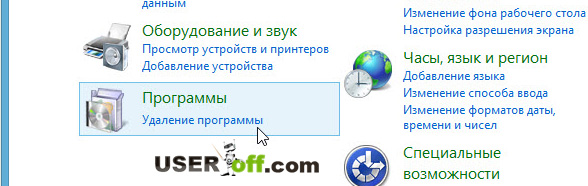
Но это только первый шаг. Далее снова заходим в «Панель управления», затем под «Оборудование и звук» нажмите «Просмотр устройств и принтеров».

Правой кнопкой мыши нажимаем по интересующему нас принтеру (их может быть несколько) и выбираем пункт «Удалить устройство».

Появится сообщение, в котором нажимаем «Да». Тем самым соглашаемся удалить это устройство.

Как только удаление завершилось, снова пользуемся теперь уже знакомой комбинацией клавиш «Win» + «X», и в выпадающем меню кликаем по пункту «Выполнить».

Теперь введите команду: «Services.msc» (без кавычек).

Перед вами откроется длинный список всех служб. Ищем среди них ту, которая называется «Диспетчер печати» и щелкаем по ней правой кнопкой мыши. В появившемся меню кликаем на «Перезапустить».


Теперь пришло время, наконец, узнать, как удалить драйвер принтера в Windows 8 окончательно. Нам снова предстоит воспользоваться сочетанием клавиш «Win» + «X» и зайти в «Выполнить». Только в этот раз нам нужно будет скопировать в поле ввода уже другую команду: «printui /s /t2» (разумеется, снова без кавычек). Окно, которое откроется на вашем экране, называется: «Свойства: Сервер печати». Необходимо зайти во вкладку «Драйверы» и там вновь щелкнуть по названию модели своего принтера. Нажимаем кнопку «Удалить…» в нижней части окошка. Когда появится подтверждающее диалоговое сообщение, устанавливаем в нем галочку напротив: «Удалить драйвер и пакет драйвера» и кликаем «ОК».

Все! Я вас поздравляю, драйвер принтера успешно удален с персонального компьютера и теперь можно смело ставить новый. Однако для перестраховки следует провести проверку. Выполняем уже знакомые нам команды: «Win» + «X», затем «Выполнить». Вводим команду «printmanagement.msc». Откроется окно, где находим в левой его части «Настраиваемые фильтры» — нажимаете, а в ней – «Все драйверы». Справа появится список, в котором находите модель своего принтера, нажимаете по нему правой кнопкой мыши и выбираете: «Удалить пакет драйвера».

Если будете устанавливать драйвер на принтер, то сделайте перезагрузку компьютера. После чего можете устанавливать новый драйвер принтера.
- Тип драйвера: Printer
- Производитель: Microsoft
- Версия: 16.0.1626.4000 (29 апр 2013)
- Файл *.inf: oem1.inf
Драйверы для Microsoft enhanced Point and Print compatibility собраны с официальных сайтов компаний-производителей и других проверенных источников. Официальные пакеты драйверов помогут исправить ошибки и неполадки в работе Microsoft enhanced Point and Print compatibility (принтеры). Скачать последние версии драйверов на Microsoft enhanced Point and Print compatibility для компьютеров и ноутбуков на Windows.
Скачать драйвер
Скачать и обновить нужные драйверы автоматически
© 2015-2019 DriverHub
Все названия продуктов, логотипы и торговые марки являются собственностью соответствующих владельцев. Все названия компаний, продуктов и услуг, используемые на этом сайте, предназначены только для идентификации.
Starting with Windows Server 2012 / Windows 8 (and newer), Microsoft introduced a new driver model for the printing subsystem called version 4 drivers (V4 printer driver model). The main idea behind it was to eliminate the disadvantages of the former V3 driver model. Basically this old model didn’t change much since Windows Server 2000. Hardware vendors wrote their own printer drivers which were mostly device specific. It was only a couple of years ago that universal printer drivers became more common. But still these drivers contain a lot of vendor specific DLLs.
Over the years, the driver database constantly grew larger. You can see this if you try to install a printer driver using the Windows update. It takes minutes until you get the updated list. This list also contains many legacy drivers of devices which are not in use anymore. From an administrator’s point of view, driver management is not an easy task because the drivers have to be provided for 32 and 64-Bit environments and must match the clients and servers’ OS architecture.
V4 drivers are available as “In-Box drivers” (included in the Windows operating system), as so called class drivers as well as vendor specific drivers which are provided by the vendor. The idea behind the class drivers is to support devices compatible with the same printer language like PostScript or PCL. This universal approach has a big disadvantage resulting in a limited feature set. Usually, only basic options like color/BW, formats, simplex/duplex for example are available. Therefore, especially multifunctional device features might not be supported.
To eliminate the lack of features for their products and to differentiate through their own interface, vendors started to provide their own V4 drivers. These drivers can be downloaded via Windows update or directly from the vendor’s homepage. However, it must be said that not all vendors provide V4 drivers.

Vendor V4 driver for Xerox Workcentre 5875
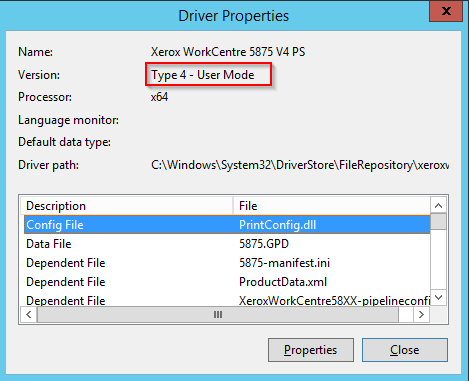
Properties of the V4 driver
V4 drivers are based on the XPS printing path. Printers that can handle XPS directly do not require any additional rendering filters. For all other print devices, the XPS format needs to be converted into their language like PostScript or PCL.
For more details on XPS see:
The disadvantage of XPS printing is that the print job has to be spooled completely before the printer starts to print. For large print jobs this can lead to a big delay which results in a poor user experience.
Another pain point in the past was the distribution of printer drivers for shared printer objects from a print server. V3 drivers had to be installed on the server and on the client. Via “Point and Print”, the driver was automatically downloaded by default from the server if the user connected to a shared printer. While this was less critical on normal desktops, it could cause big problems in terminal or virtual desktop environments. One incompatible or poorly designed driver influences all users on the server.
Starting with V4 drivers the distribution model on the print server was changed. If the user connects to a V4 shared printer queue, the corresponding V4 driver from the local driver store on the client is installed or downloaded from Windows update. If no driver is available, the so called “Microsoft enhanced “Point and Print driver” is used.
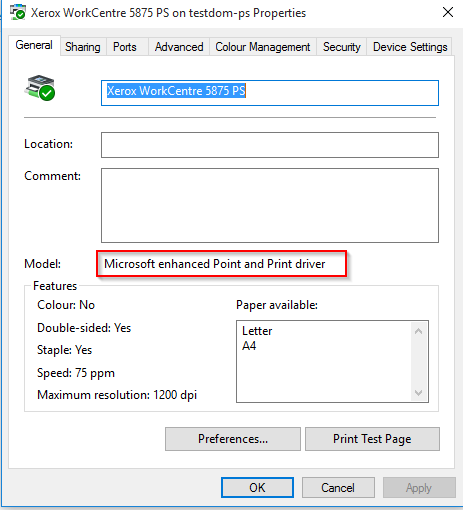
Microsoft enhanced Point and Printing driver on the client
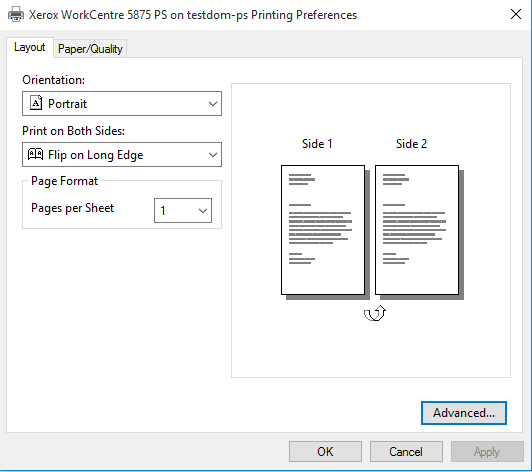
Printing preferences with the enhanced Point and Print
The enhanced Point and Print driver provides a standard interface with only limited features. Older versions of the client OS can also print to V4 queues on the print server. In that case the “Microsoft enhanced Point and Print compatibility driver” is used. This is a V3 driver which is compatible with OS prior to Windows 8.
The use of V4 drivers can be an advantage in homogenous environments with Windows Server 2012 and Windows 8 or 10 clients. V4 class drivers provide only limited features. Make sure that vendor specific V4 drivers are available.
And finally, a V4 driver can’t be connected to 3 rd party print monitors (ports). Keep this in mind when using an application requiring special printer ports, for example accounting or pull printing solutions.
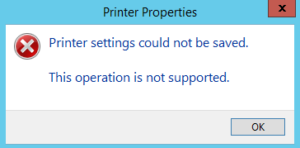
Error message when connecting a V4 driver to third party port
More details on V4 drivers can be found here: