Использовать LUT в Premiere Pro CC можно как с установкой (когда можно выбрать из списка загруженных LUT в самой программе) так и без установки (когда необходимо вручную в Премьер Про указать где находится желанный LUT.
Установка
Шаг 1:
Для установки LUT необходимо переместить файлы с Лутами в папку Premiere Pro.
По Умолчанию это — C:Program FilesAdobeAdobe Premiere Pro CC ВерсияLumetriLUTsCreative
Шаг 2:
Перезапустить Премьер Про (если он у Вас был открыт), откройте панель Color, Lumetri Color, вкладка Creative и в выпадающем списке найдите Ваши пресеты
Или можно просто открыть файл в панели Lumetri

Загрузите 17 БЕСПЛАТНЫХ таблиц для цветокоррекции видеозаписей в формате LOG. Вдохновленные творческими поисками, эти LUT легко добавят изюминку в ваши видео. Также вас ждет приятный бонус: еще 35 бесплатных LUT для формата Rec 709!
Эти 17 файлов .CUBE совместимы с различными программами видеомонтажа и цветовой коррекции, включая Adobe Premiere Pro CC 2017, FCPX и DaVinci Resolve. Данное руководство будет рассматривать именно эти три программы.
Чтобы загрузить бесплатные LUT Wanderlust, пройдите по ссылке выше. Эти LUT могут свободно использоваться в любых личных или коммерческих проектах. Загружая, вы соглашаетесь не распространять платно эти бесплатные программные средства.
Использование этих бесплатных LUT для видеомонтажа в формате LOG
Разархивируйте бесплатный файл Luts.zip в нужную вам папку. Следующие пошаговые инструкции предназначены для Adobe Premiere Pro CC 2017, FCPX и DaVinci Resolve. Если вы используете другие, обратитесь к руководству для ваших программ.

Использование LUT в Premiere Pro CC 2017
- На панели Lumetri Color откройте вкладку Basic Correction.
- В разделе «Исходная коррекция» выберите выпадающее меню «Вход в LUT» и нажмите «Обзор» …
- Перейдите в папку содержащую LUTs и выберите необходимый вам.
Использование LUT в FCPX
Чтобы использовать LUT в Final Cut Pro X, вам сначала нужно загрузить плагин LUT. Если нужен отличный бесплатный плагин обратите внимание на mLUT от Motion VFX.
- Загрузите и установите плагин mLUT от Motion VFX.
- Перезапустите FCPX.
- На таймлайне Final Cut Pro X перетащите эффект mLUT в ваш клип.
- В «Инспекторе» перейдите к интерфейсу mLUT и нажмите «Загрузить пользовательский LUT».
- Перейдите в папку скачанных LUT и выберите необходимый вам.
Использование 17 бесплатных LUT в DaVinci Resolve 12.5
- Откройте ваш проект в DaVinci Resolve.
- Нажмите колесо обработки настроек проекта в нижнем правом углу.
- Перейдите на вкладку «Управление цветом» и нажмите «Открыть папку LUT».
- Перетащите 17 бесплатных файлов LUT .CUBE в папку LUT от DaVinci Resolve.
- Закройте папки и выберите «Обновить списки» в разрешении DaVinci.
- 17 бесплатных LUT теперь доступны для выбора в раскрывающемся меню 3D Input Lookup Table.
- Выберите необходимый и нажмите «Сохранить».
Рубрики: Новости |  Комментариев нет »
- Добавить комментарий Отменить ответ
- Go Hollywood with over a dozen FREE Premiere Pro Lumetri looks! These free movie-inspired color grading presets will instantly add a dramatic look to your project.
- How to Install and Use the 14 Free Premiere Pro Lumetri Looks
- The Mars Man
- Magnificent West
- Saving Bryan
- Dr. Oddlove
- Knife Jogger
- 9 More Free Lumetri Looks
- DOWNLOAD 14 HOLLYWOOD LUMETRI LOOKS
Добавить комментарий Отменить ответ
Для отправки комментария вам необходимо авторизоваться.

Go Hollywood with over a dozen FREE Premiere Pro Lumetri looks! These free movie-inspired color grading presets will instantly add a dramatic look to your project.
These 14 free Premiere Pro Lumetri Looks are easy to use and can quickly add blockbuster style to your video. Take a peek at how simple they are to use. (Featuring the royalty free track “Thriller” by Reaktor Productions.)
How to Install and Use the 14 Free Premiere Pro Lumetri Looks
1. Click the Download button at the bottom of this post, unzip the PremiumBeat Hollywood Lumetri Looks folder
2. Go to the Premiere Pro folder
- Mac: Open a new Finder Window and go to Applications, then open Adobe Premiere Pro CC
- PC: Go to the C:/ folder, open Program Files, open Adobe, then open Adobe Premiere Pro CC
3. Open the Contents folder, Open the Lumetri folder
- Mac: Hold Command and click on Adobe Premiere CC, select Show Package Contents, open Contents, open Lumetri
- PC: Open the Lumetri folder under Adobe Premiere Pro CC

4. Open the Looks folder, then open Cine Looks
4. Drag and drop the free Lumetri .look files from the PremiumBeat Hollywood Lumetri Looks folder into the Cine Looks folder
5. Restart Premiere Pro
6. Open your project file, go to the Color tab
7. Select the clip you want to color grade on the timeline, go the the Creative tab
8. Click the Look dropdown menu, select the free Lumetri Look preset of your choice.

The Mars Man
Take your sci-fi to the Red Planet with this dusty Lumetri Look that is a total recall to blockbuster hits like The Martian.

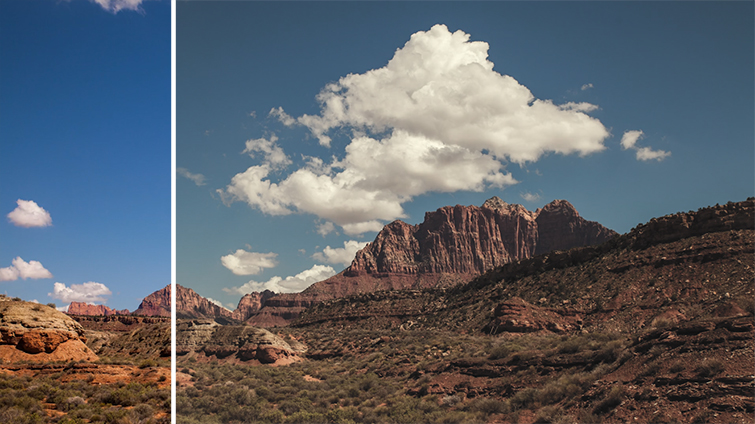
Magnificent West
Inspired by the glorious westerns of the 1960s and 70s, this faded Lumetri Look brings down the saturation in favor of the dry and beautiful landscapes of films like The Magnificent Seven.
Saving Bryan
Get the nearly mandatory bleach bypass look of war epics, reminiscent of the actual WWII newsreels that inspired the color of films like Saving Private Ryan and shows like Band of Brothers.

Dr. Oddlove
A simple faded black and white Lumetri Look that will make you wish for one of them doomsday machines, just like the one in Dr. Strangelove or: How I Learned to Stop Worrying and Love the Bomb.

Knife Jogger
The futuristic Blade Runner inspired orange and teal look that has defined action films and studio blockbusters.

9 More Free Lumetri Looks
A collection of other popular Hollywood looks available in this free Premiere Pro looks pack:
- Illinois Jones
- Raging Mule
- O Mother
- Furiosa
- Amelia
- May Tricks
- Hogwash Express
- Maximus
- Versus
These color grading presets are free to use in any personal or commercial projects. By downloading, you agree not to resell or redistribute these free assets.
DOWNLOAD 14 HOLLYWOOD LUMETRI LOOKS
What are your favorite Lumetri Looks? Let us know in the comments below.