Here’s my build of LineageOS 16.0 for Raspberry Pi 3 Model B and Model B+. It is unofficial and unsupported by the LineageOS team. It’s for advanced users only.
Important! This image includes parts that are licensed under non-commercial license (Creative Commons Attribution-NonCommercial-ShareAlike 4.0 International). You may use this build freely in personal/educational/etc use. Commercial use is not allowed with this build!
Do not mirror my builds! Please post a link to this page instead.
Sources:
Thanks:
- peyo-hd and everyone who’s contributed to android-rpi
- brobwind for graphics and bluetooth fixes
- Eric Anholt for VC4 graphics driver
- LineageOS team & everyone who’s been working on LineageOS 16.0
How to install:
- Follow the official Raspberry Pi instructions for writing the image to the SD card (Linux, Mac, Windows).
FAQ:
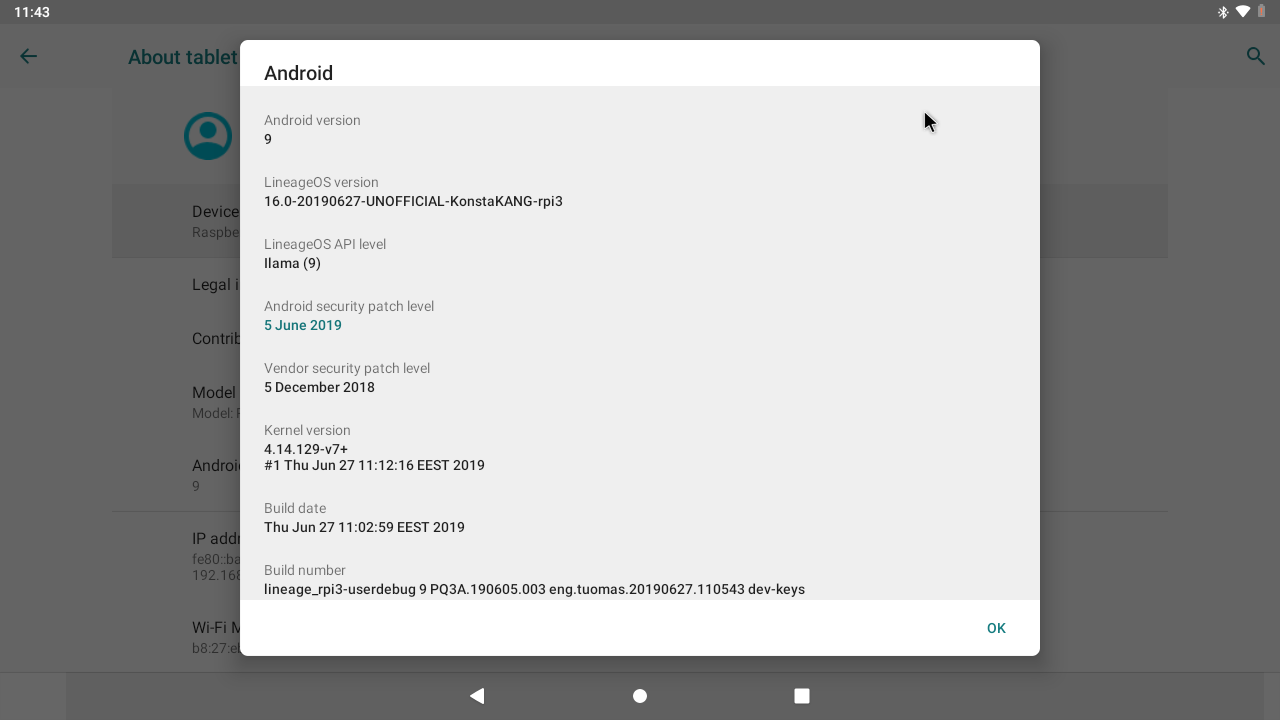
Q: I can’t find developer options, why?
A: Settings -> About tablet -> Click ‘Build number’ several times
Q: I have no root, why? What is that hashtag on my status bar?
A: You need enable root access under Settings -> System -> Developer options -> Root access. Root management is now integrated as part of LineageOS’ Privacy Guard and you can manage per app permissions under Settings -> System -> Developer options -> Manage root access. You’ll have a persistent notification in the status bar when you’re running an app that uses root permissions.
Q: Settings -> Storage shows xx GB used by system. There’s unallocated space on my sdcard. What should I do?
A: This is a 4 GB image, remaining space on your sdcard will remain unallocated. Settings app shows unallocated space as used by system which in reality it is not. You can use e.g. GParted and extend /data partition (/dev/block/mmcblk0p4) to cover the unallocated space. Resizing the partition manually will break support for encrypting /data. Format /data in TWRP recovery (Wipe->Format data) after resizing to leave required space for crypto footer.
Q: Raspberry Pi doesn’t have power button, how do I power off/reboot my device?
A: Following keyboard keys work as Andro >
Q: How to create a DIY hardware power button?
A: You can send power button events by connecting GPIO21 to ground.
Execute following commands in ‘adb shell’/serial console/terminal (you can enable built-in terminal app from Settings -> System -> Developer options -> Local terminal) to enable the feature and reboot your device:
Q: How to boot from USB device?
A: Warning, this is an experimental feature and there’s still some issues with it. Android shows USB storage notification for each partition and you should ignore these. TWRP shows errors in few places but everything seems to be working regardless of this.
- Follow the official instructions on how to enable USB boot on Pi 3 B (this step is not needed on Pi 3 B+)
- Write image to your USB device as above
- Mount the USB device on your computer and rename following files on the boot partition:
Q: How to boot to TWRP recovery?
A: There’s currently no proper way to boot between Android and TWRP, but this can achieved by renaming the ramdisk you want to boot. Execute following commands in ‘adb shell’/serial console/terminal (you can enable built-in terminal app from Settings -> System -> Developer options -> Local terminal) and reboot your device:
If mouse cursor doesn’t appear, try replugging your mouse.
Q: How to boot out of TWRP recovery?
A: You can execute the same script in TWRP terminal (Advanced->Terminal) if you have boot and system partitions mounted (Mount->Boot & Mount->System):
Or you can flash my recovery2boot zip in TWRP. If you are booting from an USB device as above you need to use recovery2boot-usb instead.
Q: How to install Google apps?
A: Warning, installing gapps slows things down especially on low-end devices with limited amount of RAM such as this one.
- Download open_gapps-arm-9.0-pico-xxxxxxxx.zip and save it to your device’s internal storage or use an external USB drive
- Boot to TWRP recovery (see FAQ)
- Install open_gapps-arm-9.0-pico-xxxxxxxx.zip from your selected storage
- Wipe->Factory reset!
- Boot out of recovery (see FAQ)
Merged commits not mentioned in the changelog.
27.6. changelog:
- initial LineageOS 16.0 build
- hardware accelerated graphics (thanks to brobwind for putting the final pieces together)
- VC4 using Mesa 19.1 with drm_hwcomposer & minigbm gralloc
- fix bluetooth on Pi 3 B+ (thanks to brobwind)
- add initial support for booting from USB devices (see FAQ)
- add support for DIY hardware power button (see FAQ)
- update TWRP to 3.3.1-0
- update to Linux 4.14.129 kernel and patch known vulnerabilities (CVE-xxxx-xxxx, and more)
- Android security patch level: 5 June 2019 (merged)
Previous builds:
Donate to support my projects: 


Pirnazar
Well-known member
1. Введение
2. Шаги для установки
3. Установка Terrarium TV
4. Заключение
Операционная система Android не спешит выходить на Raspberry Pi, хотя и использует процессор ARM.
Есть пакеты, которые безо всяких проблем могут быть установлены на Pi и позволить системе Android работать в полную силу.
Я перепробовал многие из этих пакетов в прошлом с переменным успехом.
Недавно я снова искал версию операционной системы Android для установки на Pi 3 и наткнулся на достаточно интересную сборку, скачанную с сайта konstakang.com.
Он запускает модифицированные версии установки LineageOS 14.1 (Android 7.1.2) для Raspberry Pi 3.
Он поставляется с базовым браузером, папкой с файлами и несколькими другими приложениями.
Play Store не установлен, что было достаточно хорошо для меня, так как я загружаю APK с таких сайтов, как Terrarium TV или Kodi.
После установки Android Build от Konstakang я скачал и установил Terrarium TV, и все это работало очень хорошо.
Kodi также очень популярен и может быть проинсталлирован с помощью установщика пакетов, такого как OSMC, что может быть еще проще, если будет использоваться только Kodi.
Запускать Kodi и Terrarium TV в одной и той же операционной системе довольно таки приятно, а регулярное переключение между ними является лучшим сценарием действий.
Конечно, многие другие приложения могут быть использованы и установлены, так как это операционная система Android 7.1.2.
Ниже приведены шаги, которые я использовал для загрузки Android на Raspberry Pi и Terrarium TV.
1. Первым шагом является загрузка LineageOS 14.1 Android 7.1.2 Build с сайта konstakang.com, на котором есть ссылка Скачать (Download).
Перейдите на страницу, прокрутите вниз и загрузите самую новую версию здесь.
2. После загрузки файла его необходимо извлечь, чтобы получить доступ непосредственно к файлу самого образа.
Если вы используете Windows, просто щелкните правой кнопкой мыши на «Загруженные файлы» (Downloaded File) и выберите «Извлечь ВСЕ» (Extract ALL).
3. После того, как файл образа распакован его можно записать на Micro SD-карту, которую использует Pi.
Следует использовать программное обеспечение для записи образов, чтобы записать пакет на SD-карту. Если у вас уже есть программное обеспечение нужного типа, то просто используйте его.
Если у вас нет таковой программы, то имейте ввиду, что Win32 Disk Imager является популярной бесплатной версией, которую можно использовать в этих целях.
Чтобы использовать его, просто загрузите извлеченный файл образа Android и запишите его на SD-карту.
Подойдет любая SD карта размером от 8 до 32GB.
Скачайте Win32DiskImager, используя эту ссылку:
4. Как только файл образа Android будет записан на SD-карту, извлеките её и вставьте в Raspberry Pi.
5.Подключите все необходимое, затем вы увидите логотип загрузки, который будет отображаться на экране некоторое время. Дайте ему некоторое время поработать, пока не появится главный экран.
Terrarium TV — это популярный APK, который транслирует фильмы и телепередачи.
Ссылки на скачивание Terrarium TV вы можете найти практически везде, однако, они часто удаляются с одних ресурсов и появляются на других.
Ссылка, с которой я установил данное ПО:
Просто откройте браузер Android по умолчанию, перейдите на страницу загрузки и загрузите Terrarium TV APK.
Далее должен запуститься мастер установки и попросить разрешение на продолжение инсталляции программы. Если он не запрашивает автоматическую установку, откройте диспетчер файлов (File Manager), перейдите в раздел «Загрузки» (Downloads) и щелкните по нему, чтобы установить.
В этом примере мы показали как использовать Raspberri Pi виде медиацентра. Впрочем «малину» можно использовать для пентеста, как настольный компьютер и еще многово.
In this guide, we will help you to install the latest Lineage OS 15.1 for Raspberry Pi 3 (rpi3). Earlier, we had shared the Lineage OS 14.1 for Raspberry Pi 3 based on Android 7.1.2 Nougat. A few days back, Google has released the Android 8.1 Oreo, Lineage team is soon going to release official Lineage 15.1. You might be wondering to know what about Lineage 15.0. Well, the fact is they have plans to release 15.1 directly skipping 15.0. Here we have shared the unofficial Lineage OS 15.1 for Raspberry Pi 3 based on Android 8.1 Oreo. Download and Install the latest Lineage OS 15.1 for Raspberry Pi 3.
</h2>
<p>If you still wondering whether your device will receive Android Oreo update, then check the full list of officially Android Oreo supported device from the manufacturer. In case if your phone has currently outdated and you want to upgrade to latest Android Oreo, then here are the list of Lineage OS 15.0 and Lineage OS 15.1.</p>
<p>Full Credits to the developer and Lineage team for the Open Source Project. This ROM is still under development. If you find any bugs, then either you can wait for the next update or you can simply revert back to Stock ROM.</p>
<p>Android 8.1 Oreo released officially by Google for Pixel and Nexus supported device. Now you can enjoy the Android 8.1 Oreo on Raspberry Pi 3 unofficially. The ROM brings all the features from Android 8.1 which includes, Picture in Picture mode, New Android O Emoji style, New Notification UI, Settings Overhaul changes, Advanced Doze Mode, Auto Fill Password, etc. Lineage OS also has some of the unique features which allow you to easily root and customize your phone. You will receive the regular update nightly and weekly once the build is official by Lineage tree.</p>
<h3>Also Read: Top 10 Features of Android 8.0 Oreo </h3>
<h3>What Is Lineage OS?</h3>
<p>LineageOS is based on the Android Open Source Project with extra contributions from many people within the Android community. It can be used without any need to have any Google application installed. Linked below is a package that has come from another Android project that restores the Google parts. Lineage OS does still include various hardware-specific code, which is also slowly being open-sourced anyway.</p>
<p>Now you can flash the latest Lineage OS 15.1 on Raspberry Pi 3 by simply following the below guide. To Install this ROM on your phone, you need TWRP recovery. Follow this step to install <strong>TWRP recovery on Raspberry Pi 3</strong>.</p>
<div class=)