Lenovo Miix 320 is a tiny convertible laptop that doesn’t put a hole in your wallet. It’s an amazing piece of hardware with one major flaw — It comes with Windows 10. But, worry not, I was able to successfully install and use Ubuntu 18.04 on this tiny laptop, and it is pretty neat.
- UPDATE!! Please read
- Choosing a Linux Distro
- Preparing a Bootable USB drive
- Making room for our installation
- The installation
- Disable Secure Boot
- Boot it up!
- Fixing stuff
- Disable touchpad while typing
- Fix the touch screen
- Install Xubuntu
- Fixing the brightness
- Powersaving
- Footnotes
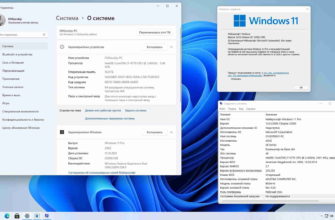
- So, what works?
- What doesn’t work?
- 20 ответов
UPDATE!! Please read
The original blog post was about installing Ubuntu 18.04 on your Miix 320. It took lot of effort to get the system to a usable state. But, I came across Pop OS by System76 (Someone mentioned it in the comments) and I gave it a shot. Surprisingly, everything works out of the box
Go HERE and download the Intel version.
You can use the instructions below to make the bootable disk etc. But, you don’t need to edit any configuration files. It should work out of the box
Choosing a Linux Distro
Update: I highly recommend Pop OS! Read the above part if you haven’t already.
I chose Ubuntu 18.04 ( as of now, it is still in beta — not a public stable release ) because it will have the latest possible Kernel, which means better hardware support. Lenov Miix 320 was released very recently and because of that, old Kernels doesn’t play nice with the hardware. Even with the latest available hardware, we need to do quite some work to get some stuff (like, boot!) working properly.
Let’s get started
Preparing a Bootable USB drive
Go ahead and download the Ubuntu iso from HERE. Make sure you download the 64bit version. If you are too lazy to do that, HERE is the direct link to the ISO
Now that we have the ISO, we need to write it to a flash drive. I use Etcher which is an amazing open source tool to flash OS images.
Go ahead and download Etcher and prepare the bootable flash drive
Making room for our installation
It is not a good idea to wipe the disk and install just Linux as things are not pretty yet. If you rely on this laptop to get things done, I recommend you keep Windows10 until you are sure that the Ubuntu installation works great for you.
If you plan to keep Windows 10, boot into it, launch the disk management tool and shrink your C drive. The maximum shrinkable size depends on the current usage of the Disk. We need at least 10GB of free space in the new partition.
If you are not able to get 10GB out, try deleting some files and try to shrink it again.
Note: Just leave the free partition as it is. We will format it from Ubuntu, so, we don’t have to anything to it from Windows
The installation
Disable Secure Boot
Press the power button (hold it for a second to power it on) and then press Fn+F2 to get into the BIOS
In the BIOS, use the right arrow to go to the Configuration and then disable Secure Boot from there.
Boot it up!
Connect the USB, power on the Laptop and press Fn+F12 to get the boot menu. Choose your USB drive and press enter.
WARNING!! : In the Grub menu, DO NOT PRESS ENTER YET The thing is, with the default boot parameters, it just won’t boot in this particular laptop. We need to change some boot paramaters so that it comes up.
In the grub menu, press e to edit the entry.
Above the line that starts with linux , add the following
At the end of the line that starts with linux , add the following
What nomodeset does is, it tells the kernel not to load the v >fbcon=rotate:1 rotates the display clockwise. We need to do this because, otherwise Ubuntu will be in portrait mode. We don’t want that. So, the resulting screen would look something like this
Press Ctrl+X to continue with the boot. It will go to the normal Ubuntu installation screen. I guess you know how to handle the installation.
Once the installation is finished, Reboot your laptop. Do not forget to remove the USB drive.
IMPORTANT: Once you are at the Grub menu again, press e and do exactly the same as we did just above.
NOTE: After the boot, chances are you will be greeted with a black screen. Just close the lid for a second and open it again and you should see the login screen
Once you boot into the Ubuntu desktop, open a terminal and edit the file /etc/default/grub
Add the following lines into it
Press Ctrl+X and then Y and press Enter to save it.
Open a terminal and run the following
This will update your Grub with the parameters and you won’t have to edit anything next time you boot.
NOTE: Someone in the comment suggested to use xrandr -o right to rotate the display and this command is universal across distros Thank you Taylor
Fixing stuff
Now that we have our Ubuntu installation working, there are many things that still need work.
Disable touchpad while typing
This can be very annoying. By default, it doesn’t disable the touchpad while typing. So, there is a good chance that you might end up touching your touchpad and cause a tragedy. Use the following command to disable touchpad while typing
Fix the touch screen
Good news is that, the touch screen works nice. But, it is twisted to the right. You’d come to understand it if you try to scroll/touch the screen.
The following command should fix that and you should be able to use the touch screen properly in landscape.
If this doesn’t work for you, your вЂID’ might be different. Use the following command to find out the correct ID
Look for the device id that looks similar to “04F3224A:00 04F3:237D” and use that in the command
Install Xubuntu
By default, Ubuntu 18.04 has Gnome as the desktop environment. While it is all shiny, it’s quite heavy. For a tiny laptop like the Miix 320, we’d need something light.
Note: this is optional — Only if you need a less resource hungry desktop environment
Logout, Choose Xubuntu from the login screen and you should be good to go.
Fixing the brightness
Yeah, so another thing that doesn’t work yet is the brightness control. But, we can have a hack for now. Please note that this thing doesn’t help with the battery as it is more like an overlay that reduces the light intensity. But, surely it can help your eyes
Then, search for brightness controller and you can adjust the intensity of the backlight
Powersaving
So, another bad thing is that the battery life would be not great. The following tool might help a bit.
Footnotes
While Ubuntu 18.04 in the Lenovo Miix 320 hybrid laptop is not perfect, it works great. It works much much faster than Windows 10, and you can actually get some work done in this tiny little laptop.
So, what works?
- Keyboard
- Touchpad
- Touchscreen
- Sound
- Battery indicator
- WiFi
- All Major functions
What doesn’t work?
- Camera
- SD Card slot
- Brightness control
Well, that’s all about it. Let me know if you have question in the comments and I’ll try to address it. 🙂
У меня новый гибридный планшет Lenovo miix 320. Я попытался установить Ubuntu 17.04 и получил скриншот с полным набором линий или черным экраном. Я попробовал nomodeset, но все равно не работал.
Как это исправить?
20 ответов
У меня такой же микс, это проблема с UEFI и внутренним SSD, BIOS не может быть сконфигурирован в режиме AHCI (Tales of Lenovo . ). Таким образом, вы можете загружать сеанс в реальном времени, устанавливать все прошивки и использовать его с Ubuntu или Debian (я успешно тестирую тестирование Debian, включая образ прошивки и Ubuntu MATE, и он может работать с любым дистрибутивом, использующим kernel> = 4.10), но вы не можете установите Linux во внутреннюю память. Мой следующий шаг: попробуйте установить Debian на SD-карту и сделать что-то с приоритетом загрузки, но я пока не знаю (нет параметров в BIOS . ).
Short: вы еще не можете установить Linux , но вы можете использовать Linux с SD-карты, пока Lenovo не решит проблему.
Short: Вы еще не можете установить Linux, но вы можете использовать Linux с SD-карты тем временем, прежде чем Lenovo исправляет проблема. Как я мог видеть по моему опыту, у вас будет несколько проблем для настройки сенсорного экрана (вы можете включить и настроить графику, вам нужно будет создать конфигурацию init, чтобы получить правильную ориентацию экрана, и многое другое чтобы синхронизировать ваши прикосновения с помощью мыши на экране, и многое другое, если вы хотите авторотировать экран и хорошую конфигурацию аселерометра), иногда у меня были проблемы с Wi-Fi (этот турнир сам по себе), и я думаю, что это не возможно управлять диском (вы можете монтировать, umount, читать и писать, но не пытайтесь изменять размер или создавать другие разделы в inter nal ssd, вы можете сломать всю таблицу разделов).
Если кто-то думает об этом, я пытаюсь изменить размер раздела Windows, чтобы получить свободное пространство, я создал раздел ext4, и я установил Debian в этой части с помощью Debootstrap. Он работал, но невозможно установить GRUB или LILO (потому что ядро не может получить информацию о диске), поэтому я загрузился с USB-накопителя, а в меню GRUB USB-накопителя я использовал командную строку GRUB для загрузки в Debian. Все прошло отлично, но я не мог настроить графику.
Работала Ubuntu 18.04. Я попробовал несколько вещей, поэтому следующий список может быть неполным, но я обновлю его позже после создания резервной копии.
Внимание: Ubuntu 18.04 еще не выпущен, поэтому его можно считать неустойчивым. В то же время доступна ежедневная сборка.
Запишите ISO-диск ubuntu на USB-накопитель (я использую unetbootin, crossplatform и работает как шарм). Выключите безопасный режим в BIOS (чтобы войти в BIOS, нажмите F2, когда Появится логотип lenovo) Доступ к меню загрузки UEFI (F12, когда появляется логотип lenovo) и выберите USB-накопитель. Выберите Try Ubuntu и нажмите «E», чтобы отредактировать меню. Найдите строку, начинающуюся с «linux», и добавьте «nomodeset» в конец строки. CTRL-X для продолжения загрузки.
Вращение экрана может быть неправильным, и вывод консоли не выглядит читаемым. Но он загружается. После загрузки экран будет в портретном режиме. Вы можете изменить поворот экрана в меню настроек «Отображает».
Предупреждение:
После некоторых попыток загрузки экран был черным. Но после пятой или шестой попытки он показал рабочий стол. Позже я узнал, что система действительно загружается, просто закрывает и открывает крышку и / или нажимает несколько кнопок — она в конечном счете оживится.
Слот для SD-карты не работает (это может быть исправлено в будущих обновлениях). Wi-Fi часто ломается. Оказалось, что это проблема управления питанием Wi-Fi. Мне удалось найти решение, но не помню, где я его нашел. Я расскажу об этом позже. Нет индикатора заряда батареи. В качестве временного решения я заметил, что когда батарея разряжена, экран начинает мерцать.
I have installed Ubuntu 18.10 on my tablet PC Lenovo Miix 320. It works fine except on boot : when the pc boots, the screen remains black. If I want to open it, and use the computer, i need to snap the lid onto the keyboard and wait for about 30s and, if i get chance, the screen will enlight when unsnap. If i get less chance i have to snap again, wait a little more and it will works when unsnap and if i don’t get chance, i need to reboot with magic keys to be able to use the computer (after snap — wait — unsnap). I tried all the tips found on the net, no success :
Modifying grub by adding :
GRUB_CMDLINE_LINUX=»nomodeset i915.modeset=1 fbcon=rotate:1 modprobe.blacklist=axp288_fuel_gauge»
Modifying initramfs (changing MODULES=most by MODULES=list and editing modules)
Does somebody has an idea to solve my problem and gain a computer that works as it must does ?
NB: the blogs i used to perform the install :
NB 2 : no camera or SD card but it’s not my question, only to inform.