
Плагин MIDI Out не воспроизводит звук самостоятельно. MIDI Out действует как диспетчер MIDI, посылая стандартные сообщения MIDI к плагинам или внешним аппаратным средствам MIDI, которые установлены на тот же номер MIDI порта, как показано в верхнем правом углу MIDI плагина.
Как было сказано, чтобы установить связь между MIDI Out плагином и целевым устройством MIDI, нужно соответствие номеров порта MIDI Out плагина и порта MIDI целевого устройства. Установка ‘Channel’ позволяет передавать независимые (многотембровые) данные. Например, внешний многотембровый инструмент можно присоединить к порту 2, звуки барабана играть в канале 10 (управляемым из Piano roll) и струнные инструменты в канале 2 (управляемым от другого канала Piano roll). Контроллеры целевых плагинов/аппаратного оборудования, как колёсики mod и т.д., имеют MIDI CC (смена регулятора) числа, назначающие им те действия, которые «адресованы», кнопкам и регуляторам целевого плагина/внешнего устройства. Обратитесь к документации third party, чтобы изучить эти СС числа.
Fruity LSD — это ваш друг: MIDI out плагин — великолепный компаньон для плагина Fruity LSD. Как только MIDI Out был установлен на тот же порт, что и LSD плагин, Вы можете выбрать звуки из параметров MIDI Out Patch и послушать, как они проигрываются через FL Studio mixer.
Содержание
Использование внешних синтезаторов, драм машин и других устройств MIDI [ править ]
Если Вы хотите внедрить звуки от внешнего MIDI-устройства, нужно экспортировать их вместе с остальными внутренними плагинами в конце рендеринга, для этого нужно:
- Установить MIDI-соединение с внешним оборудованием.
- Установите аудио-соединение между внешним оборудованием и входом звуковой карты.
- Загрузить канал MIDI Out и установить на тот же порт, что и внешнее MIDI-оборудование.
- Ввести или записать данные партитуры в Piano roll или Stepsequencer, связанный с каналом MIDI Out.
- Записать устройство обратно в FL Studio, так как оно использовалось каналом MIDI Out.
- Поместить записанный аудиоклип в Playlist и произвести окончательный рендеринг.
Замечание: MIDI — это не аудио-соединение.
Параметры [ править ]
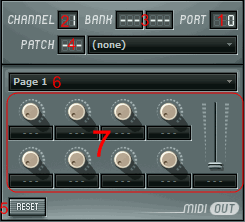
- Port (Порт) — Это главная связь между M >MIDI Out и Piano roll [ править ]
Вы можете независимо управлять 16-ю инструментами с помощью одного MIDI Out Piano roll, используя функцию цветовых групп нот в различных каналах MIDI. В скриншоте ниже номера MIDI-каналов были добавлены для ясности. Чтобы увидеть номер MIDI-канала в FL Studio, перемещайте мышь над каждым цветом и смотрите на панель подсказок.
M > 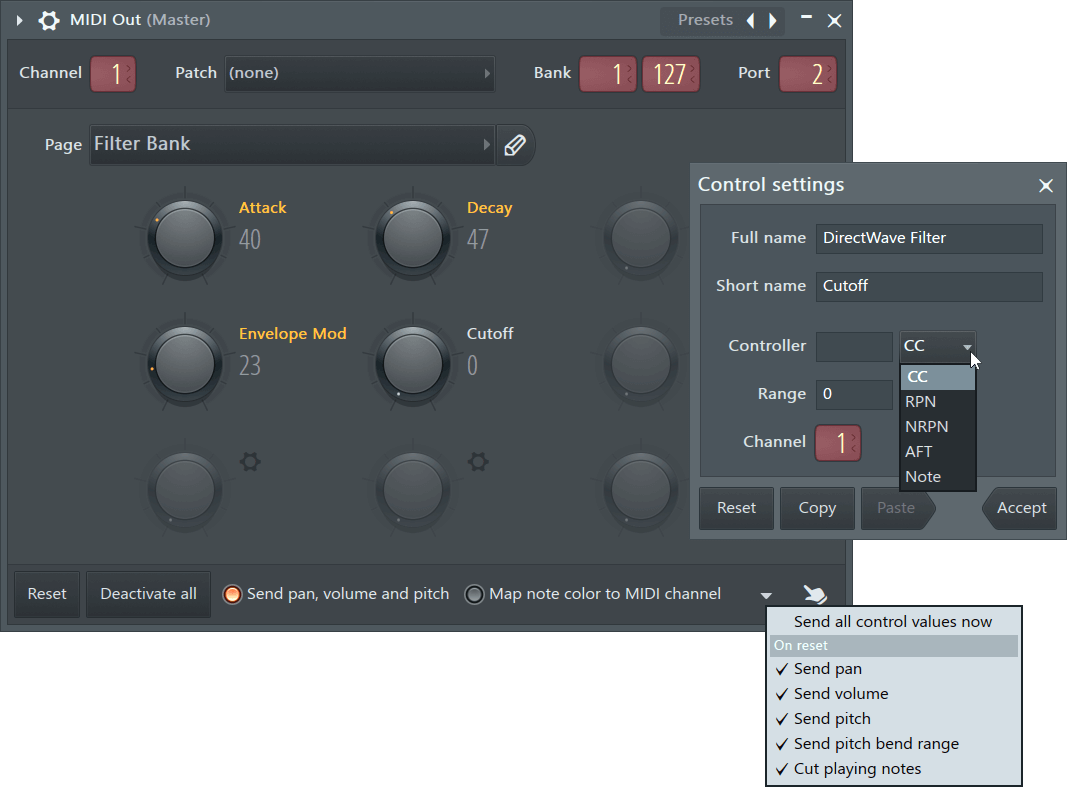
NOTES: Click gear icons to open the Control settings. Orange labels show activated controls (transmitting data), left-click the label to activate/deactivate controls.
Controlling internal VST plugins
Use M > 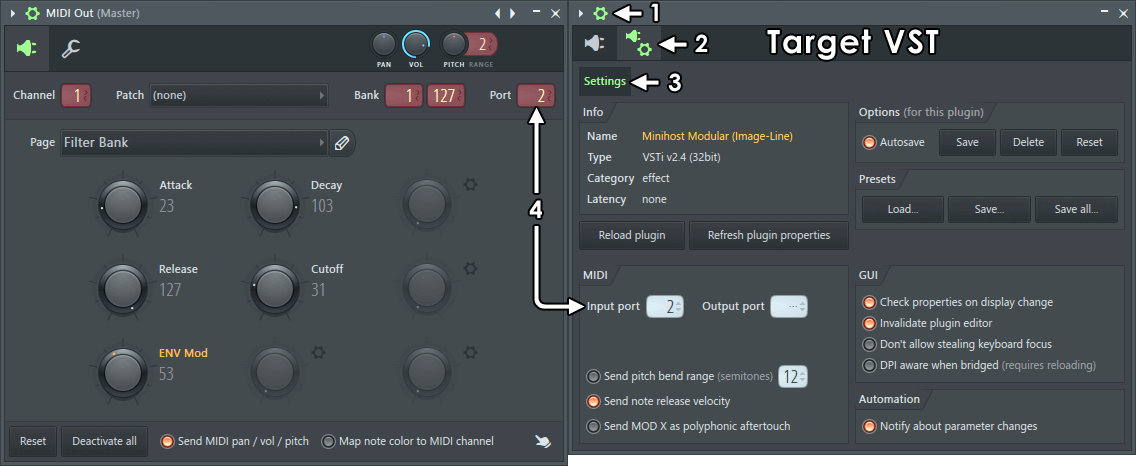
- Open the Wrapper Options — Click the icon on the top of the VST plugins Wrapper.
- Open the Wrapper Settings — Click the icon.
- Select the Settings tab — Click the tab.
- Match MIDI Port numbers — Set the Input Port number on the VST plugin’s wrapper to the same Port number as MIDI Out. 256 Ports are available, the Port number setting you use is arbitrary, it’s up to you.
MIDI Channels — Where VST plugins respond to MIDI Channels ‘Map note color to MIDI channel‘ can be used to play separate voices. You can also use the Control Settings to assign knobs to MIDI Channels. NOTE: Unless you have a specific reason to use MIDI Out, we recommend using note colors on the VST plugins Piano roll to play MIDI Channels. If necessary, you can load multiple MIDI Out plugins and match Port numbers to the VST and then set independent MIDI Channels for each MIDI Out. This will allow you to play each MIDI channel in the VST plugin from a separate Piano roll.
Controlling external synthesizers, drum machines & other MIDI devices
To incorporate the sound from external M >
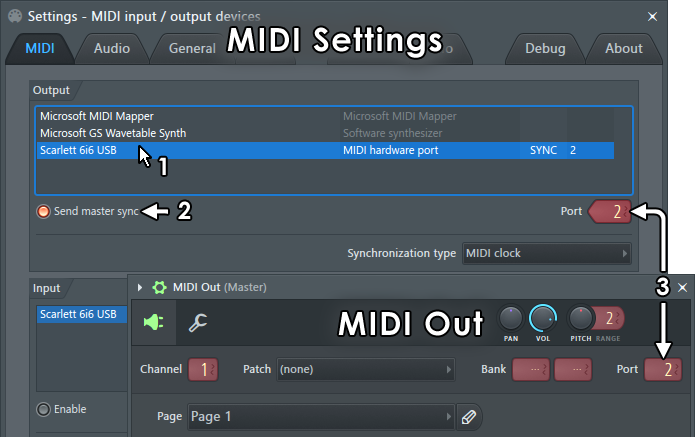
- From the MIDI Settingsselect the device in the Output list (click devices in the list to select them).
- Match Port numbers — From the MIDI Settings make sure the Port number matches the Port number on MIDI Out (any number between 0 and 255 can be used).
- Make MIDI connections — Connect your MIDI interface (MIDI OUT) to your MIDI device (MIDI IN) as per the manufacturers instructions.
- Set the MIDI Channels — Set your external MIDI device to the same MIDI Channel as the MIDI Out plugin. There are 16 Channels that allow you to control different MIDI devices on each channel. If you set your MIDI device to Omni mode it will respond to all MIDI Channels (see the manufacturers instructions).
- Send MIDI pan / vol / pitch — ONLY set this on if you intend to send Pan, Volume or Pitch-bend commands to the target device. OTHERWISE leave this off, as it can cause some devices to behave unpredictably when they receive these messages, when not supported.
- Send master sync — ONLY if the device has an internal sequencer, turn ON ‘Send master sync‘ to transmit transport control data (start, stop, tempo, etc) from FL Studio. OTHERWISE leave this off, as many MIDI devices that don’t handle transport data can behave unpredictably when they receive these messages. Ensure your external MIDI device is set to receive (slave to) MIDI sync data AND is set to the same ‘Synchronization type‘, (MIDI clock, MTC 24, etc), as per the manufacturers instructions.
- Connect the audio — Make audio connections from your MIDI device’s audio outputs to your soundcard audio inputs. This will usually be a line-level input, not a microphone input.
- Sequence your MIDI device — Enter or record your score data in the Piano roll or Step Sequencer associated with the MIDI Out controlling the external hardware.
- Loop-back recording (optional) — If you are playing MIDI notes on the external device you may hear doubled-notes, flanging or flaming. This happens because the device is playing sound internally from its own controller (no latency) and also receiving notes back from MIDI Out (with latency). Most hardware synthesizers and drum-machines have a setting, ‘Local Control‘, that disables the keyboard or pads from playing sounds locally. See your device manual for details.
- Make a live recording — Record the device back into FL Studio, as it is played by the MIDI Out channel.
- Audio clips — Place the recorded Audio Clip in the Playlist and render the final track.
NOTE: MIDI is not an audio connection, see the Wizard section ‘How do I connect my keyboard/controller/synth to my PC’ for advice and further links on setting up external MIDI hardware to be recorded in FL Studio.
Parameters
M />Multitouch — Select to control more than one knob at a time on a touch interface.
Control Settings
Click the icons or right-click a knob and select ‘Configure’:
Страницы
четверг, 15 августа 2013 г.
MULTI-OUT, M >
Статья взята с «нормального» сайта: ТУТ!
Очень многие виртуальные инструменты ( VST, VSTi ) имеют несколько или множество лейеров в которые можно загружать различные пресеты инструмента.
Для начала, я немного повторюсь ( ибо такая тема в блогах уже была ), и расскажу как все лейеры инструмента играть в FLStudio.
Для примера я возьму виртуальный инструмент Spectrosonic Omnisphere и выберу в нём 2 инструмента в разных лейрах. ( Смотри рисунок ниже ):
вы видите на рисунке, что я отметил галочками выбраные нами присеты и обвёл красным карандашом важный момент, – канал к которому приписан данный пресет.
Вы пытаетесь сыграть с клавиатуры, сыграть с миди-клавиатуры, нарисовать ноты в пиано роле, а играет только пресет номер 1 и никак иначе.
Для того чтобы сыграть остальными пресетами надо сделать следующие действия: