After finishing my lab on NPS with PEAP-MSCHAPv2, I’m going to try out the EAP-TLS Authentication on the same lab
Pre-Requisite of EAP-TLS Authentication on User’s Workstation
- Root Certificate need to be import to non-domain joined machines
- Generating Client / User Certificate from CA Portal
- Connecting to WIFI Network using EAP-TLS
Export Root Certification and import to Windows 10
You can use ADSI Edit to navigate to “ CN=Certification Authorities,CN=Public Key Services,CN=Services,CN=Configuration,DC=MonsterBean,DC=com ” to verify or check where is the CA Server installed and y ou will find your Enterprise Root Certificate Autority server under “Certification Authorities”
» means nesting-related): — Failed at: @displayUserCertifications user_id [in template «custom.author-acclaim-certifications» at line 4, column 9] ——>
- Mark as New
- Bookmark
- Subscribe
- Mute
- Subscribe to RSS Feed
- Permalink
- Email to a Friend
- Report Inappropriate Content
On the windows 10 supplicant configuration, there is not an option that says » Smart Card or other certificate»? If yes, that is the one you need to use for eap-tls authentication. Now, for this method to work properly, you also need to have the Root/intermediate CA certificates on the ACS, under «Certificate authorities» section.
So when the ACS receives the client certificate, it can trust on it.
it would be helpful if you could upload screenshot of your supplicant configuration, and from the ACS reports.
» means nesting-related): — Failed at: @displayUserCertifications user_id [in template «custom.author-acclaim-certifications» at line 4, column 9] ——>
- Mark as New
- Bookmark
- Subscribe
- Mute
- Subscribe to RSS Feed
- Permalink
- Email to a Friend
- Report Inappropriate Content
Thanks for reply.
The ACS is configured correctly, since I have many laptops joined at the eap-tls ssid, even non domain joined laptops, the difference is that I have not tryed windows 10 home edition. I said about non domain laptops because on domain joined laptops is too easy to join, the certificates is already on windows repository and most of the times is just clicking on ‘connect’ and all the configurations is done automatically.
About this specific laptop, the certificate is configured with the right certificate container. I was trying the «windows: eap-ttls» as a authentication method but I was also tried the ‘microsoft: smart card or other certificate’ as well as ‘microsoft: protected EAP (PEAP)’ configuring certificate further.
On testing and troubleshooting on ACS, it was not possible to do a configuration so I could put the username, it always recognize the local user and of course not validating, but on ACS the log says ‘. because client rejected ACS local certificate’.
When configured so I can input user/password, I have log saying ‘selected authorization profile is denyaccess’, that is not true since the same user can connect from another laptops.
Published: June 17, 2018 \ Applies to: How To, Windows 10
For communication securities, Windows uses Transport Layer Security (TLS) protocols. With the help of TLS standard level authentication protocols, your Windows system can securely communicate to Internet websites. You can learn more and in detail about TLS on Wikipedia. Mainly there are 3 TLS protocol versions Windows have at the moment. These are TLS 1.0, TLS 1.1 and TLS 1.2 versions.
You can enable or disable either of these TLS protocol versions as per your requirement. There are two ways, in which you can configure TLS protocol settings on your Windows 10. Both ways are mentioned below, try them as per your convenience,
How To Configure TLS Settings In Windows 10
WAY 1 – Via Internet Properties
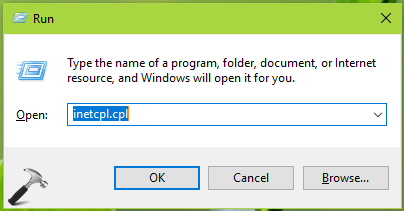
1. Press  + R and type inetcpl.cpl in the Run dialog box, to open Internet Properties.
2. In Internet Properties window, switch to Advanced tab. Under Settings, scroll to Security heading. Beneath it, you’ll find Use TLS 1.0, Use TLS 1.1, Use TLS 1.2 options. You can enable/disable these options to allow/prevent corresponding TLS protocol.
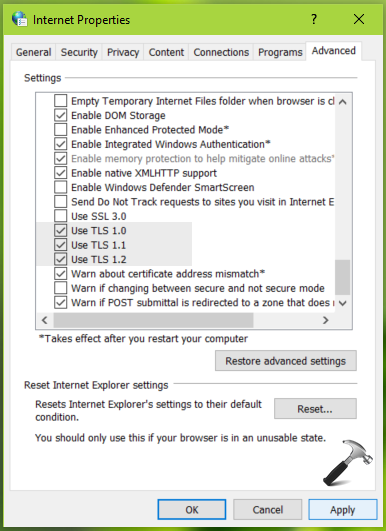
3. Once you’re done with your selection, click Apply followed by OK to save your settings.
Now let us see, how to use registry to configure TLS settings on your Windows 10.
WAY 2 – Via Registry
Registry Disclaimer: The further steps will involve registry manipulation. Making mistakes while manipulating registry could affect your system adversely. So be careful while editing registry entries and create a System Restore point first.
1. Press + R and put regedit in Run dialog box to open Registry Editor (if you’re not familiar with Registry Editor, then click here). Click OK.

2. In left pane of Registry Editor window, navigate to following registry key:
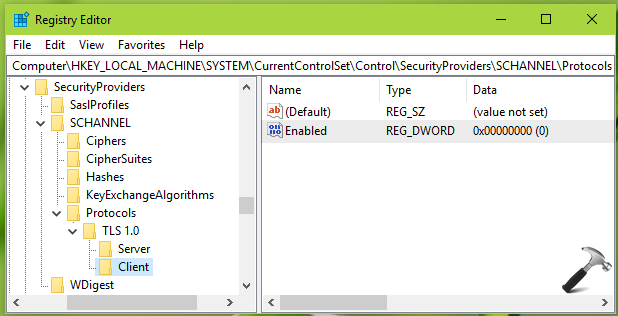
3. Right click Protocols registry key, select New > Key. Name the newly created sub-key as TLS 1.0. Similarly create two sub-keys to TLS 1.0 registry key and name them as Server and Client. Now in the right pane of Client registry key (HKEY_LOCAL_MACHINESYSTEMCurrentControlSetControlSecurityProvidersSCHANNELProtocolsTLS 1.0Client), right click and select New > DWORD Value. Name the newly created registry DWORD (REG_DWORD) as Enabled. Double click on this DWORD to modify its Value data:
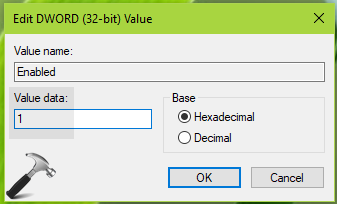
4. Finally, set the Value data to 1 to enable TLS 1.0 protocol. Click OK. If you want to allow TLS 1.0 to server side as well, create Enabled registry DWORD and set it to 1, for Server registry key (HKEY_LOCAL_MACHINESYSTEMCurrentControlSetControlSecurityProvidersSCHANNELProtocolsTLS 1.0Client) as well.
5. You can follow similar way for other TLS protocols such as TLS 1.1 and TLS 1.2 versions. Create TLS 1.1, TLS 1.2 registry sub-keys to Protocols registry key, and then create Client, Server specific registry sub-keys and then add Enabled DWORD to control the corresponding TLS version. Once you’re done, close Registry Editor and make sure to reboot the machine to make changes effective.
In this way, you can configure to TLS settings in Windows 10.

About Kapil Arya
Kapil is presently a Microsoft MVP in Windows IT Pro expertise. He is Windows Insider MVP as well, and author of ‘Windows Group Policy Troubleshooting’ book. In 2015, Microsoft India accomplished him as ‘Windows 10 Champion’. Being passionate Windows blogger, he loves to help others on fixing their system issues. You can follow him for news/updates and fixes for Windows.
Follow @KapilAryaMVP
Suggested Articles
2 Comments
Jacek
Thanks. For me TLS 1.2 stopped working (failed to receive handshake in all browsers, curls etc…). Tried many things with no luck. Only after manually setting up register values as you mentioned – started working.