Can I run Android Studio and Android SDK emulator in a Microsoft hyper-v virtual machine? Please read carefully.
I already use Hyper-V a lot for other purposes. Now I need to develop a app for Android.
I’ve installed a new virtual machine (windows 10) and installed Android Studio. I cannot run the android emulator because it’s lacking the ‘intel HAXM software’.
I read a lot about that it’s not possible to install Hyper-V NEXT to Android Studio, but non of the post actually say anything about installing in a Hyper-V machine.
- 7 Answers 7
- Try the preview
- 1. Enable Hyper-V and the Windows Hypervisor Platform
- 2. Install the Visual Studio Tools for Xamarin preview
- 3. Update to Android Emulator 27.2.7 or above
- 4. Start debugging!
- Share your feedback
- Before I begin
- Preparing Hyper-V
- Install the Visual Studio Preview
- Verify your Android emulator version
- Running the emulator
7 Answers 7
The solution (if you do not want to disable Hyper-V) is to use Microsoft’s Android emulator, which is a free download here.
In order to use this with Android Studio, you need to run the emulator first. Then, in Android Studio, go to Run > Edit Configurations. and select Show Device Chooser Dialog under Deployment Target Options.
Run your project, and select the VS Emulator, ignoring the invitation to “Turn off Hyper-V”.

Hyper-V added support for nested virtualization in the Windows 10 Anniversary Update (released August 2016) and Windows Server 2016. However, the only Microsoft-supported usage of nested virtualization is running Hyper-V within the VM, not HAXM. From the official documentation, «Virtualization applications other than Hyper-V are not supported in Hyper-V virtual machines, and are likely to fail.»
That said, the change log for the latest release of HAXM reports that Intel «Fixed an issue with Hyper-V nested virtualization support, which had prevented Android Emulator from booting.» So while it isn’t supported by Microsoft, it seems running HAXM nested in a Hyper-V VM may be possible.
If that’s the case, to get HAXM working in a Hyper-V VM, you will need to enable nesting for that VM. Run this command on the VM while it is in the OFF state:
After that, you should be able to install the latest version of HAXM within the VM, allowing use of the Android Emulator. Again, I haven’t personally verified this, and it isn’t supported by Microsoft, so your mileage may vary.
Full disclosure: I work at Microsoft on the Hyper-V team.
[Edit 7/2/2018]: Android Emulator support for Hyper-V acceleration was announced earlier this year, and is currently in preview. See the announcement post for details.
Today, at Build 2018, we announced a preview of the Google Android emulator that’s compatible with Hyper-V, available on the Windows 10 April 2018 Update. This enables developers with Hyper-V enabled on their machines to use a hardware accelerated Android emulator, without needing to switch to Intel’s HAXM hypervisor. Amazing work was done by the Windows Hyper-V team, with help from the Xamarin team, to make to this happen.
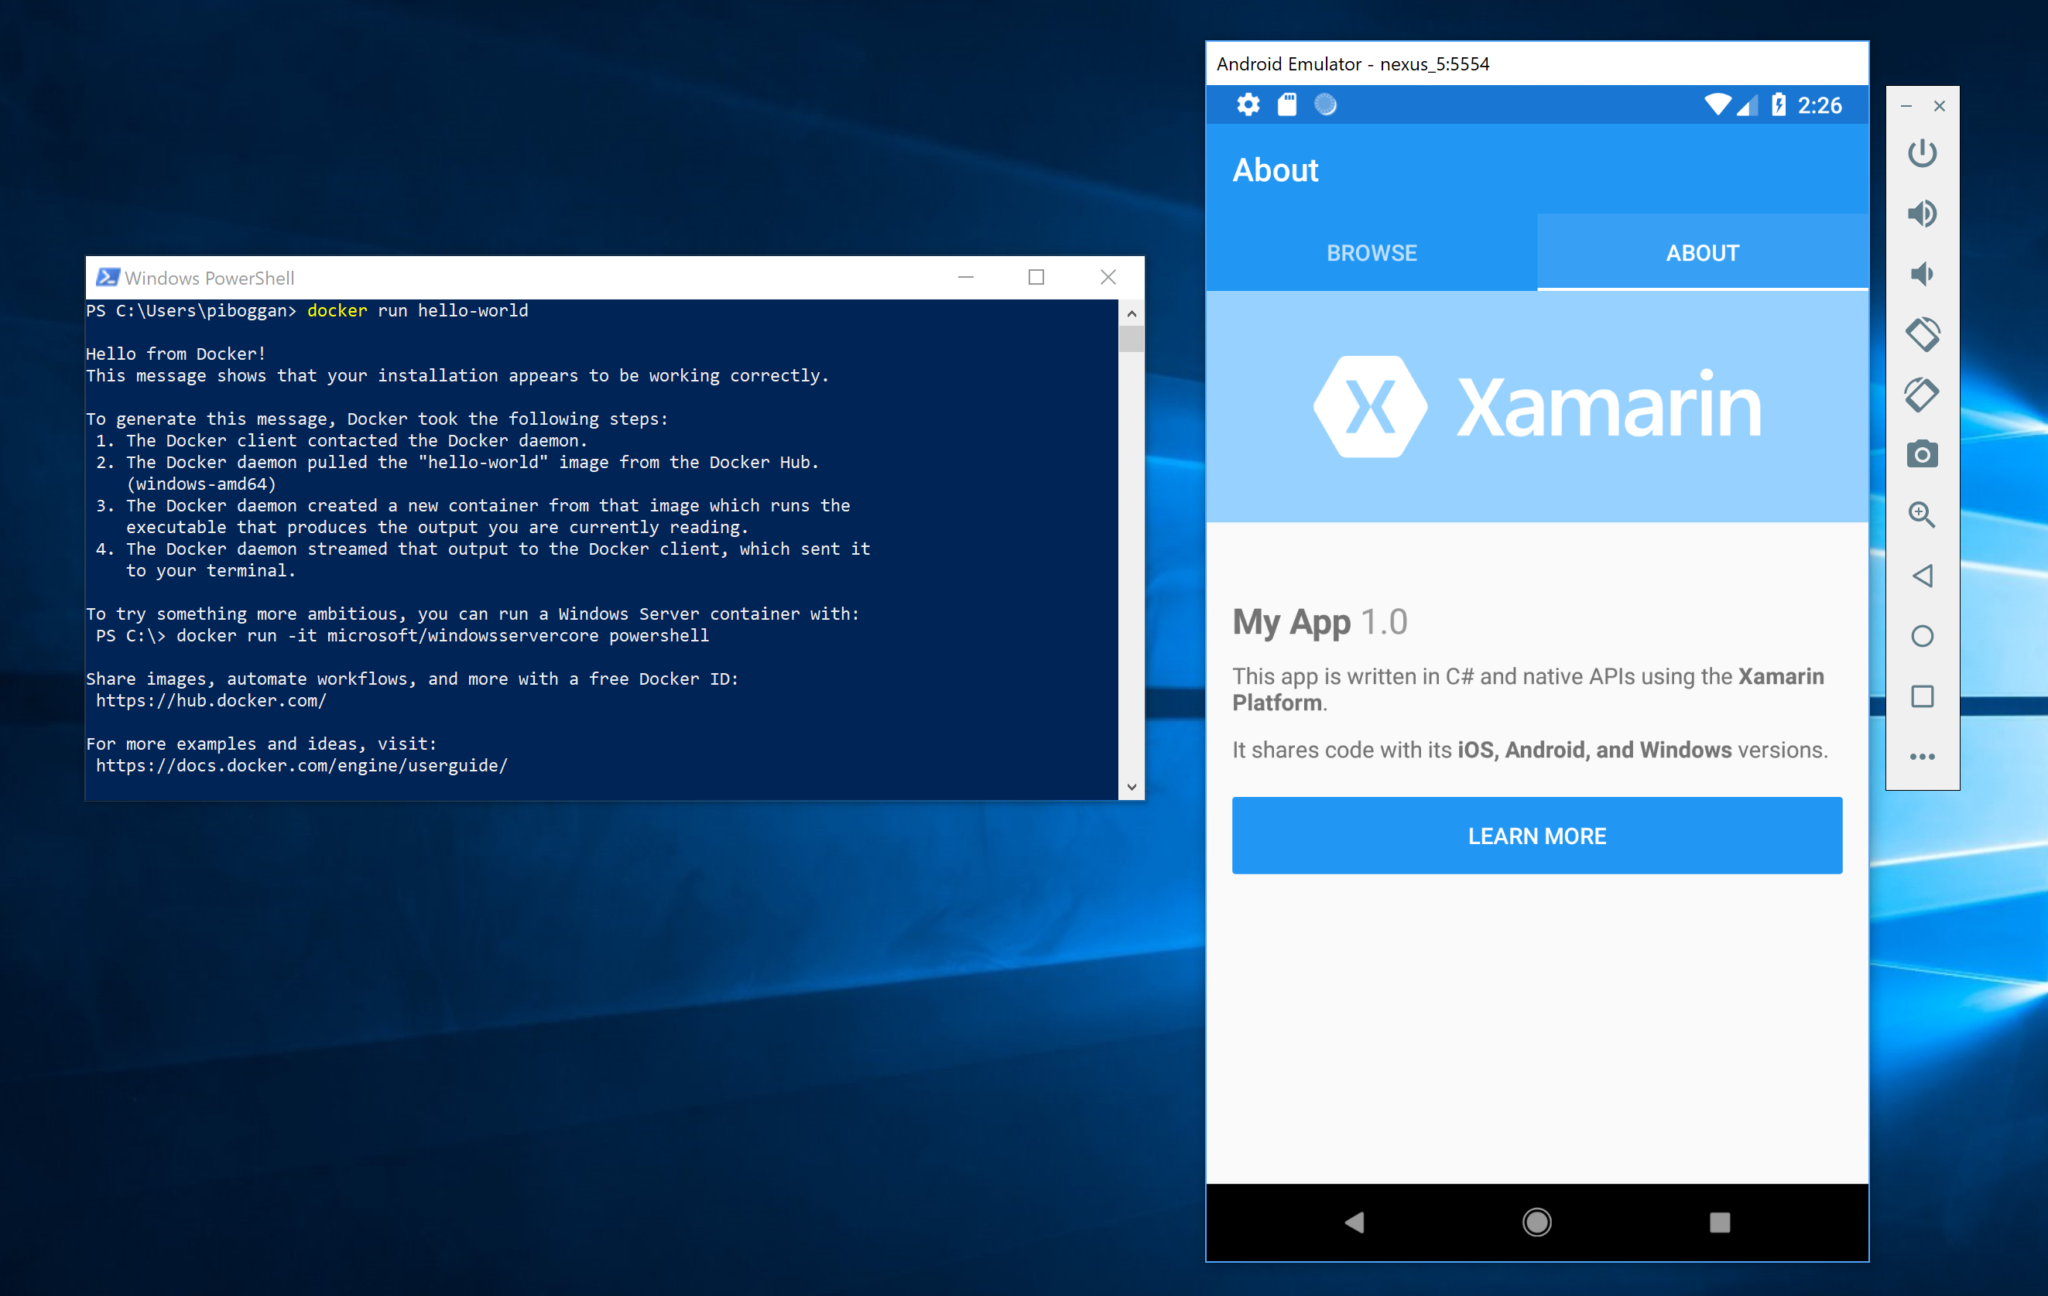
Today’s preview means you can use Google’s Android emulator side-by-side with other Hyper-V based technologies, including Hyper-V VMs, Docker tooling, the HoloLens emulator, and more. This means that any Android developer on Windows, who also uses Hyper-V, can use a fast Android emulator that will always support the latest Android APIs, works with Google Play Services out of the box, and works with all features in the Android emulator, including camera, geolocation, and Quick Boot.
Try the preview
The Windows Hypervisor Platform was introduced in the Windows 10 April 2018 Update and enables third-party virtualization stacks to utilize the Windows Hypervisor for hardware acceleration. If you are using Hyper-V, this stack replaces Intel HAXM as the hypervisor for the Android emulator.
Support for using the Windows Hypervisor as an accelerator for the Android emulator is currently in preview and requires the Windows 10 April 2018 Update. Here are the steps to get it installed.
1. Enable Hyper-V and the Windows Hypervisor Platform
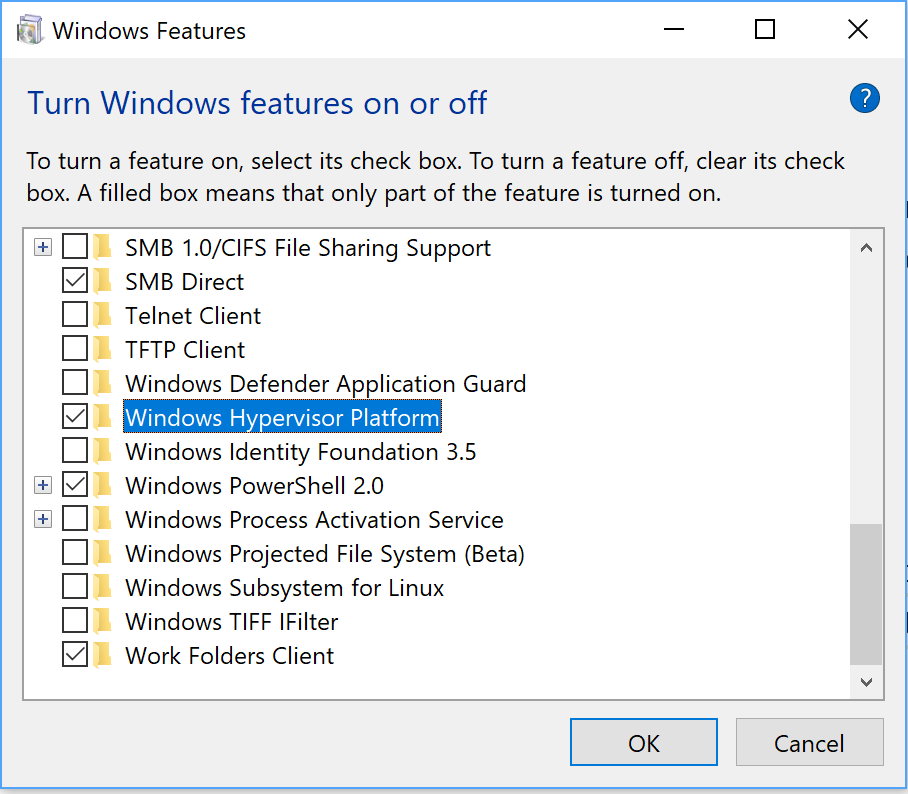
Open Turn Windows features on or off and select Hyper-V and the Windows Hypervisor Platform checkboxes. For these features to take effect, you will need to restart your machine.
2. Install the Visual Studio Tools for Xamarin preview
To enable IDE support for the Android emulator, such as debugging, you must install an updated preview of the Visual Studio Tools for Xamarin. First, ensure you have Visual Studio 2017 version 15.8 Preview 1 or higher with the Mobile development with .NET (Xamarin) workload installed.
Download and open the preview installer. Click Install.
3. Update to Android Emulator 27.2.7 or above
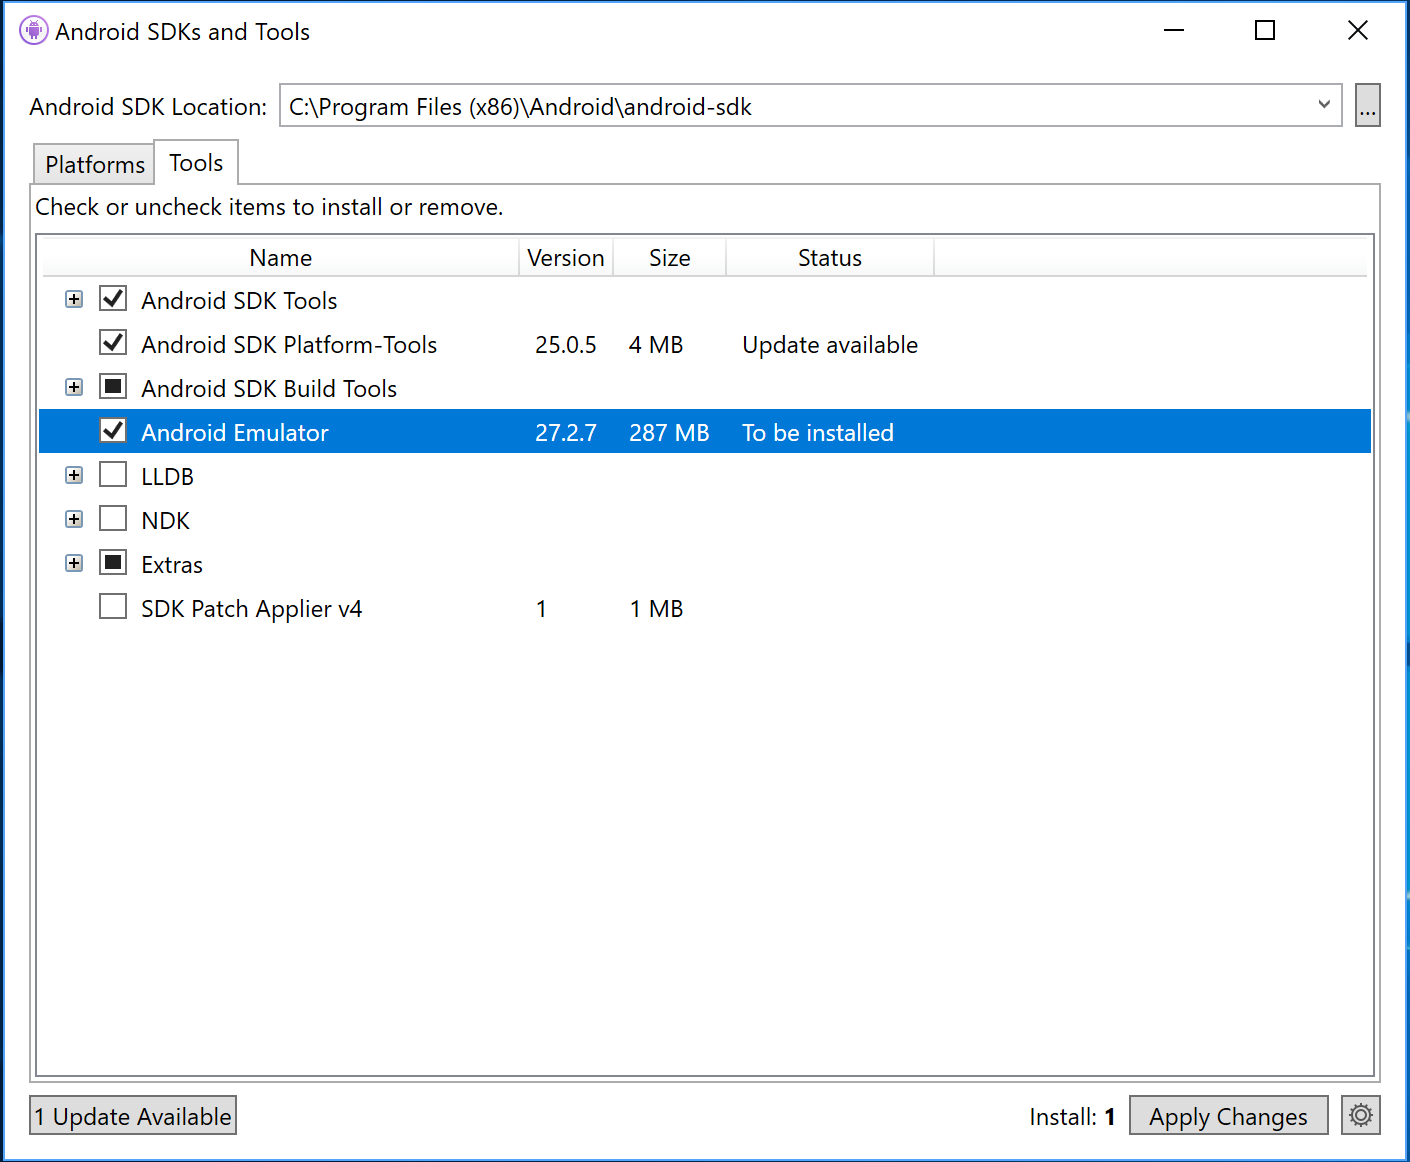
In Visual Studio, select Tools > Options > Android > Android SDK Manager. Click the Tools tab, select the Android Emulator component, and select Apply Changes.
Please note: More recent versions of the emulator (27.2.8, 27.3.0, or later), require an emulator flag while the feature is in the preview. To do this, create or edit the file C:Users .andro >
4. Start debugging!
Now when you debug your Android apps, you can use the latest Android SDKs in a fast emulator, right from Visual Studio alongside Hyper-V based technologies like Docker.
Share your feedback
We need your help to make using the Google Android emulator with Hyper-V an amazing experience. Be sure to share your feedback in Visual Studio by going to Help > Send Feedback > Report a Problem if you experience any problems or strange behavior. Please provide the following information in your bug report:
- Android emulator log – In Visual Studio, open the Output window and select the Debug output pane.
- Android emulator configuration file – In File Explorer, navigate to %HOMEPATH%.androidavd and attach the configuration settings file (.ini) for the Android emulator.
- System Information – Open System Information and click File > Export.
For more information on configuring the Hyper-V emulator, and for a listing of known issues, visit our documentation.
One of the announcements that caught my attention at this year’s Microsoft Build conference was that it there is now an Android emulator that has been specifically designed to work with Hyper-V. As such, I thought that it might be fun to work through the setup.
Before I begin
Before I get started, I need to point out that the Android emulator currently only works on the Windows 10 version of Hyper-V. Windows Server is not yet supported, although it seems likely that we will see Windows Server support for the emulator in the near future.
Preparing Hyper-V
To run the Android emulator, you will need to install both Hyper-V and the Windows Hypervisor Platform. In case you are not familiar with the Windows Hypervisor Platform, it is a component that allows third-party virtualization stacks and applications to be used.
To install the required components, open Control Panel and then go to Programs, followed by Programs and Features. Next, click the option to turn Windows features on or off. Now, select the options for both Hyper-V and the Windows Hypervisor Platform. You can see the Windows Hypervisor Platform shown in the image below.
Install the Visual Studio Preview
To use the Android emulator, you are going to need Visual Studio installed on your Windows 10 machine. Because the emulator was only recently introduced, the current release of Visual Studio will not work with the emulator. That being the case, you will have to download and install Visual Studio 2017 version 15.8 Preview 1 or higher. You can download the preview here.
The process of installing the Visual Studio preview is really straightforward, although it does require a lot of disk space (nearly 15GB). The one thing that you will have to do during the installation process is to install the Mobile Development with .NET workload. If you’re not familiar with Visual Studio, the installer prompts you to choose which workloads you want to install. Mobile Development With .NET is one of the choices, as shown in the image below. Just make your selection and click Install.
When you click Install, the installation process will begin. Depending on the speed of your PC and the amount of Internet bandwidth that you have available, this can take a while. You can see what the install process looks like below. Incidentally, you will have to reboot once the installation process finishes.
Verify your Android emulator version
If you look back at the previous screen captures, you will notice that an Android emulator gets installed along with the Mobile Development With .NET workload. However, there is a possibility that the workload does not contain the correct version of the emulator. The only way to know for sure is to check Visual Studio and see which emulator version is currently installed.
To do so, launch Visual Studio, and then click on the Tools menu and select the Android command, followed by the Android SDK Manager command. This will cause the Android SDKs and Tools dialog box to open. Go to the dialog box’s Tools tab and locate the Android Emulator. As you can see in the image below, the current version is 27.1.12. At the time this article was written, the current version was 27.2.7, which means that we need to download the newer version and perform an update.
To do so, download the Xamarin for Visual Studio update. Keep in mind that I am working with a preview release, so it is possible that the download link could change. When the download completes, open the file and you will be taken to a window like the one shown below, prompting you to install the update. Make sure that the Visual Studio preview checkbox is selected and click Install.
When the installation completes, close the installer and go back into Visual Studio. Next, go back to the Tools tab on the Android SDKs and Tools window that I showed you earlier. Now when you look at the Android Emulator, the version number should still be the same, but the Status column should indicate that an update is available. Go ahead and click on the Updates Available button shown below.
Click on the button in the lower left corner to install the updates.
Running the emulator
To run the Android emulator, open a Command prompt window and navigate to C:Program Files (x86)AndroidAndroid-sdkemulator. Next, you will need to retrieve the names of the AVDs that are installed. To do so, enter the following command:
You can see what this looks like in the image below:
Now it’s time to launch the emulator. Remember that we want to run this on Hyper-V, so we will need to specify the Windows Hypervisor Platform as a feature within the command. We will also need to include the name of the AVD and the partition size. The command syntax looks like this:
Emulator -avd
In my case, the exact command that I am using to launch the emulator is:
Emulator -avd Android_Accelerated_X86_Oreo -partition-size 512 -feature WindowsHypervisorPlatform
There are a couple of things that you need to know about using this command. First, the command line switches need to be entered in lower case if they are to work properly. Second, it is normal to get a couple of warnings or errors the first time that you run the emulator. Here is what the launch looks like in action.
If you have entered the command correctly, the emulator should open, as shown below.
Although setting up the Android emulator involves a bit of work, subsequent uses should be relatively simple. You can even create a batch file or a shortcut to make it easier to launch the emulator in the future.