
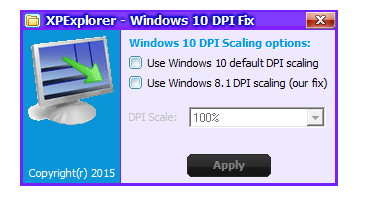
XPExplorer — Windows 10 DPI Fix — крошечная утилита, которая позволит решить проблему размытых шрифтов в Windows 10. Многие испытали эту проблему на своих ноутбуках с небольшой диагональю экрана в разрешении FullHD.
Решить эту проблему в Windows 8.1 многие могли без проблем, однако на Windows 10 все оказалось куда сложнее, именно поэтому и появилась данная утилита, вероятно потом данная проблема будет решена самой компанией.
XPExplorer — Windows 10 DPI Fix вносить изменения в реестр, таким образом будет произведена корректировка экрана «hight DPI” доводя параметр до оптимального размера. Обратите внимание, что каждый раз перезагружая систему, Windows сбрасывает настройки масштабирования, поэтому программа прописывается в автозагрузку и сразу после запуска вносит изменения в реестр.
Использовать программу легко, после запуска надо просто отметить галочкой параметр USE Windows 8.1 DPI Scaling (our fix), далее видим список под названием DPI Scale, там надо выбрать 125 процентов, после надо перезапустить систему, на этом манипуляции можно закончить, всем удачи!
Название выпуска: Windows10.DPI.FIX.v2.2
Разработчик: XPExplorer
Лицензия: FreeWare
Язык: English
Размер: 1.09 MB
ОС: Windows 10
Скачать:
XPExplorer — Windows 10 DPI Fix v2.2
XPExplorer — Windows 10 DPI Fix v2.1
Вкл Выкл 

IMPORTANT NOTE — 14 April 2017.
If you are using the latest version of Windows 10 (Creators Update) you might not need this DPI Fix (if you already have, you can simple run the DPI fix and set it to »Use Windows 10 Default DPI scaling’ and hit ‘Apply’).
It looks like Microsoft fixed this blurry fonts finally for a lot of people.
But we still get emails from people that said the Creators Update did not fix their blurry fonts and that our DPI fix did.
So if you still have blurry fonts after the Creators Update, you can use this DPI Fix to make them razor sharp.
Welcome.
This page is only intended to help you with the DPI Scaling for Windows 10 if you have blurry fonts on high DPI.
When we installed Windows 10. We noticed the DPI scaling is not working as it was in Windows Vista, 7 and 8(.1).
The problem in Windows 10:
When you have a widescreen, with a resolution of 1920×1080 or higher or a bit lower, in Windows Vista, 7, 8 and 8.1 you would put your DPI scaling to 125% or higher to make text and images appear larger and more easy to read.
But when you put the DPI scaling to 125% in Windows 10, you see in a lot of dialogs and windows the font gets very blurry.
It does not matter if you are using the regular or custom Windows DPI scaling functions at your ‘Screen properties’. Text will get blurry on 125%.
You can test if you have this bug also if you put your DPI scaling to 125% at your ‘Screen properties’, then reboot Windows (or sign in again when it asks you).
Then goto ‘Control panel > Administrative tools > Services’.
If you have this issue also you would see the titlebar of the Services window has a font scaled good. But the services list itself is very blurry/unsharp to read.
The SIMPLE fix:
Right-click on the shortcut to your application that has blurry fonts, then select ‘Properties’. Then tab ‘Compatibility’. Then enable ‘Disable display scaling on high DPI settings’ and hit ‘Apply’. then restart your application, and you see it will look good.
The DPI fix:
Windows 10 is using another scaling method for DPI as in Windows Vista, 7, 8 and 8.1.
At some point we can understand Windows why they changed the DPI scaling in Windows 10. It is probably ment to support mobile devices more easy.
But if you like to use your Desktop as a Desktop, and you demand high quality only. Then you can use this fix until Microsoft has addressed this issue.
This fix simple tells Windows 10 to use the original DPI scaling as it was in Windows Vista, 7, 8 and 8.1.
Why this is a small software program, and not some ‘Registry Tweak’ is because when you manually adjust the DPI settings at your ‘Windows Registry’. Windows will reset your dpi settings every 2 reboots. Which means you would have to adjust the registry again (Microsoft forces you almost to use its new DPI scaling method).
You could use a batch file for it that starts when you start Windows(r) to change the registry DPI settings, but then a ugly CMD box would show if you turn on your computer.
This method we created simple works, does what you want. And will not show a ugly CMD box because its using pure API.
Side effects:
— It needs to start when Windows starts, but only for a couple milliseconds (you will not see it afcourse). Then it will adjust the DPI scaling to use the Windows 8 way. And then it will close itself.
— In Microsoft Edge (its new browser) some Adobe Flash objects will appear smaller, but you can simple overcome that by using Internet Explorer 11, or Chrome, or FireFox.
Screenshot:

Created by: Michiel Schermer (Netherlands)
If your AV gives a false-positive, let us know at Info@XPExplorer.com with the name and version you are using, we are in contact with all major virusscanners but at the moment we are very busy with updates to support Windows 10 in our primary product.
This tool does not use internet, you can put a registry/tcp/disk monitor on it to see what it does, and then you see it only does what you want it to do.
We at XPExplorer only like happy people, not unhappy. You can read more about our policy at our main website.
Note for Google VirusTotal users.
30 augustus 2015: White-listing completed for all AV’s for version 2.1.
Tip: At VirusTotal click at tab ‘Additional information’ and look for ‘First submission’ date.
If a file changes, the ‘First submission’ will change also at VirusTotal and votes will be resetted.
- Review
- Free Download
- Changes the DPI scaling method in Windows 10, configuring the operating system to use the one in Vista, 7, 8 and 8.1, which comes in handy for high-resolution displays
- What’s new in Windows 10 DPI Fix 2.2:
- Small tweak to change DPI scaling
- Useful for high-res w >Windows 10 DPI Fix comes in handy to users of computers equipped with a high-resolution widescreen (1920×1080 or higher) who want to enlarge icons and text, but the content of many windows gets blurry when trying to adjust the DPI scaling manually to 125% or more.
- Fix DPI scaling in Windows 10
Review
Free Download
Changes the DPI scaling method in Windows 10, configuring the operating system to use the one in Vista, 7, 8 and 8.1, which comes in handy for high-resolution displays
What’s new in Windows 10 DPI Fix 2.2:
- Version 2.2 supports 4k-monitors and all laptop screens, and it can scale up to 300%.
Read the full changelog
Windows is configured to automatically detect your monitor’s size and display the desktop at the appropriate scaling level. However, if you want to modify the default settings and tamper with the default DPI scaling to make icons and text larger and easier to read, some windows might display blurry content, especially on high-resolution widescreens. Instead of experimenting with different settings and signing out and in to apply changes, you can use Windows 10 DPI Fix.
Small tweak to change DPI scaling
Delivered inside a lightweight package, this application aims to make your desktop look good, no matter the resolution of your display.
Its main window comprises two options: one to use the Windows 8.1 DPI scaling and the other to switch to the default display scaling in Windows 10. You simply have to check the desired option and press the ‘Apply’ button, but note that one or even two (to apply the default Windows 10 DPI scaling) computer reboots are mandatory for the changes to take effect.
Useful for high-res w >Windows 10 DPI Fix comes in handy to users of computers equipped with a high-resolution widescreen (1920×1080 or higher) who want to enlarge icons and text, but the content of many windows gets blurry when trying to adjust the DPI scaling manually to 125% or more.
Its purpose is to provide a simple means of shifting from the default Windows 10 DPI scaling method to the one used in Windows Vista, 7, 8 and 8.1. With its help, there will be no blurry text on your display.
Fix DPI scaling in Windows 10
Windows 10 DPI Fix is configured to start with Windows, so as to be able to automatically adjust DPI scaling. It just applies the changes and closes itself afterward, without interfering with your work. It is nothing more than a straightforward way to fix the DPI scaling issues you might be experiencing in Windows 10.